
Sunday, May 13, 2012
Hemp Bracelet Project Completion
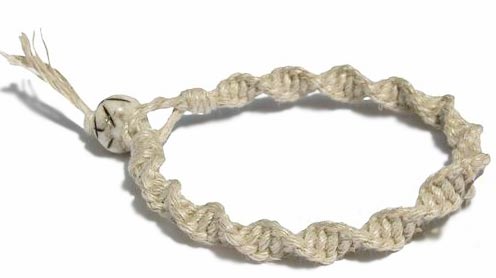
Finally finally finally. I have completed my second project. It is my series of hemp bracelets. The top bracelet was made using a repeating square knot. The second is a spiral knot which is wonderfully similar to a double helix. Nerdswag. The third is an alternating square knot. I believe the most difficult aspect of this project was making the bracelets uniform, as hemp is an extremely inconsistent material. The smaller and thinner the hemp, the more consistent bracelets will turn out.
Sunday, May 6, 2012
Bracelet Project Progress [1]
Well, since you had your child and part of my serotonin project is with you, I started my hemp bracelet project. (How do I get that back, by the way? I need to finish that soon.)
So, initially I tried thicker hemp. Apparently that's out of the question. It makes a good width bracelet, but the hemp is not uniform enough throughout to make the bracelet as perfect as I would like. I'm currently making bracelets of medium sized hemp, and they're turning out well. I do, however, love the uniformity of the very thin, thin hemp, despite how small of bracelets it makes. For this reason, I believe I'll be using the same knot with different sizes of hemp. I'll do this with each new knot that I learn for a total of hopefully five or so bracelets.
I am running out of time, so I need to hurry my butt up and learn. The knot with which I've been working is the basic square knot. It looks a little like this.

I've also been working with a spiral knot. That looks pretty cool, and is also very simple to do. It looks a little like this.


So, initially I tried thicker hemp. Apparently that's out of the question. It makes a good width bracelet, but the hemp is not uniform enough throughout to make the bracelet as perfect as I would like. I'm currently making bracelets of medium sized hemp, and they're turning out well. I do, however, love the uniformity of the very thin, thin hemp, despite how small of bracelets it makes. For this reason, I believe I'll be using the same knot with different sizes of hemp. I'll do this with each new knot that I learn for a total of hopefully five or so bracelets.
I am running out of time, so I need to hurry my butt up and learn. The knot with which I've been working is the basic square knot. It looks a little like this.

These are the knots from which I'll be picking for my next ones to learn.

Sunday, April 29, 2012
Serotonin Project Progress (Week 3)
Sadly, due to testing schedule, senior trip, etc., I got very little done this week because I wasn't in class. I plan to be done soon, though. I have almost cut out all of my copper. I still have to drill holes, bend the cuffs, and assemble my bracelet together.
So, as my research for my project this week, I decided to research the individuality of my project. I've seen many serotonin-themed pieces of jewelry. Most of these, however, are one simple serotonin molecule on a bracelet or necklace as a pendent or link. My project is unique in that it utilizes the molecules as a functional aspect of the jewelry, the cuffs. My project also combines a more scientific, nerdy meaning into it with the addition of the brain centerpiece.
Most of the serotonin jewelry I found online was simple, like these pieces.


These pieces stick to one single molecule as a pendant or centerpiece of their jewelry. I could not find any made from copper, but only silver or other silvery metals. Many put the molecule on a silvery chain or fabric thread.
Though I'm sure they exist somewhere, I could not find any serotonin bracelets. The majority of serotonin-themed jewelry was made up of necklaces, earrings, and keychains, like the following.


Though it's been very complicated to make, I am happy that the piece I'm creating is so individual. :)
Sunday, April 15, 2012
Serotonin Project Progress (Week 2)
As of this week, I am almost finished cutting out my serotonin cuffs. It took a while for my thicker gauge copper to finally come in so that I could have sturdy cuffs on my bracelet. Here's a reminder of my plans for my nerdy jewelry. (On phone. Can't rearrange pictures. But the reminder is the first picture.)
As of now, I am on step four. I will first drill holes centered in the end of the molecule on both cuffs. Then, I will line the two frames up and drill the four holes so that the two frames are perfectly aligned. The second picture shows the locations of my drill holes. If I were to rivet the cuffs and frames like this, the cuffs would swivel, which I do not want them to do. For this reason, I will be doing some soldering between the top frame and the cuffs. When I solder them together, I will solder them with my rivet already through so that the other side of the rivet sticks out the back like two posts. The third photo shows the design of this.
After this, I will rivet the other frame to the front frame and molecules, keeping my transparency between the two frames. After that, I will rivet the bottom two drill holes to make the frame more stable, then bend the cuffs to fit my wrists.
So far, the most difficult part of this project has been measuring and drawing out my cuffs onto my metal so that they may bend to fit my wrists perfectly.
The only issue about which I'm stil concerned is whether I want to use liver of sulfur on my metal, turning it black. I definitely would rather it be black, but there is much more room fr error if I choose to liver of sulfur my pieces.
Sunday, April 1, 2012
Serotonin Project Progress
Alright. Serotonin is the chemical released in the brain responsible for happiness and pleasure. My concept for this year happens to be harmony, which correlates pretty well with how happy you are, thus also directly related to how much serotonin your little brain pumps out. My initial design used serotonin molecules as the cuff section of a copper bracelet with a brain shaped pendant in the center. I, however, am just a little art three-zy I'm not capable of actually molding a brain form out of copper. My compromise: A brain printout on a transparency, sandwiched with mica between two frames of copper, a window to the wearer's wrist.
The first photo is my initial drawing with the brain window. I decided against cutting the copper in the shake of the brain on the frame and decided instead to use a hexagon. The second photo shows this drawing.
It's my plan to rivet, as well as solder the serotonin cuffs into the frame. This way, the cuffs will be sturdy and solid, rather than pivotal.
Regarding the sturdiness, there is one other aspect of the bracelet which is specific. The cuffs are cut out if a thicker gauge copper than the frames. This is so that it is a wearable, tough little nerd bracelet. But that's me. I'm a nerd.
Oh, and hey, Ms. Stamper. I would rotate those, but I'm on the blogger app on my phone and it won't let me. Sorry. :)
Tuesday, February 28, 2012
[B9] X-Ray Project (Surgery make-up)
I've been brainstorming how I can incorporate my insanely crazy cool spine x-rays into my art. I came across some amazing, amazing x-ray art that I had no idea people were doing.
My ideas for my x-rays were possibly creating some sort of lampshade from them, so that light would shine through and show them. This could be like a Japanese paper lantern with screens, possibly. However, after doing my own personal research, I've decided that the best product may be achieved by digital means. My x-rays, unlike the following, are solely the bones and titanium within me. However, with the use of photoshop and stock images, I could mold my x-rays into images such as the ones below. I would certainly position these from the back, so as to more easily find my body type in a stock image. I believe I could shop my incision into the picture, as well. If all goes well, the product should turn out similarly to the following.


My ideas for my x-rays were possibly creating some sort of lampshade from them, so that light would shine through and show them. This could be like a Japanese paper lantern with screens, possibly. However, after doing my own personal research, I've decided that the best product may be achieved by digital means. My x-rays, unlike the following, are solely the bones and titanium within me. However, with the use of photoshop and stock images, I could mold my x-rays into images such as the ones below. I would certainly position these from the back, so as to more easily find my body type in a stock image. I believe I could shop my incision into the picture, as well. If all goes well, the product should turn out similarly to the following.


My research on my x-ray project also showed me that artists are using x-rays of plants, animals, and inanimate objects to create beautiful art which one cannot see with the naked art. By x-raying these objects, an entirely new beauty shows through.

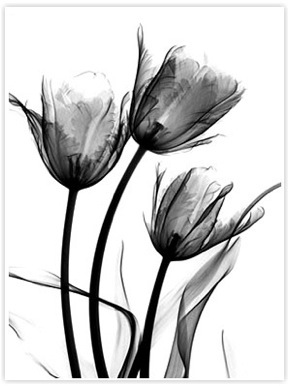
The art of Nick Veasey is also one you may want to check out. :)
[B8] Unconventional, but brilliant. (Surgery make-up)
The past blog was dedicated to strange art mediums. This one, however, is devoted to strange artists.
Katie MccGwire is an woman who lives and works in London as an artist. Her main medium in her pieces is pigeon feathers. She models them to make them look even prettier than the birds themselves.


Katie MccGwire is an woman who lives and works in London as an artist. Her main medium in her pieces is pigeon feathers. She models them to make them look even prettier than the birds themselves.


The next unusual artist is Luke Jerram, from the UK. He's most famous for his glass microbiology, in which Jerram creates replicas of viruses.


Possibly the most interesting artist I ran across is Cecelia Webber. Though they first look like normal flowers, her art is much more than average. Her medium is humans. Yes, humans. Webber positions and paints human beings to look like large flowers. This would be much more interesting to see as a live sculpture, I'm sure.


The art of Sabi van Hemert reminds me of something you may see in a horror film. He is a dutch artists who creates art out of fusions of children and animals. Van Hemert says, “I create images that evoke associations with people and animals. I imagine the balance between the many conflicting feelings and thoughts that a man can have. Balance between opposites as attractive / repulsive, happy / sad or fear / security. My pictures have something in them that causes you to think what to see and feel that it gives you, and then confirm again denied.” At least you don't have to bear to look his creatures in the eyes, though. Each of them is faceless.


Tuesday, February 7, 2012
[B7] Unusual Art Mediums (Surgery Make-up)
After doing my mixed media project, I realized that there are an infinite amount of mediums one can use to create art. This blog is dedicated to exploring the most unusual, awesome art mediums out there.
Beginning with trash. This sculpture is called Lips by Tom Deininger.


Beginning with trash. This sculpture is called Lips by Tom Deininger.

The next unusual medium is recycled carrier bags. This is called the Eden Project.

This medium is colored pencils. The usage, however, is far from what you would expect.

This next sculpture by Liz Hickok is quite a bit more appetizing than the others.

Music becomes visual in this next sculpture, constructed using cassette tapes.

This piece called Chemical Balance is constructed using prescription bottles.

This music tends to flow over you. ;)

Artist Scott Wade uses one of the messiest mediums–dirt.

An infinite number of mediums makes for a wonderful world of art. :)
Subscribe to:
Posts (Atom)